pop3 thì nó sẽ lưu file pst trên máy, data sẽ xóa trên web sau 14 ngày ( mặc định setup của app outlook) mặc định khi login pop3 đều enable tính năng xóa email nên ít ng tắt
imap thì data sẽ lưu dạng file tạm là ost và lưu trên web
thư viện cài Exchange 2019:
https://docs.microsoft.com/en-us/exchange/plan-and-deploy/prerequisites?view=exchserver-2019
Video hướng dẫn cài exchange 2019:
https://www.youtube.com/watch?v=-vIX2Ss5_5E
Link hướng dẫn cài Exchage 2019:
https://judeperera.wordpress.com/2018/08/06/step-by-step-guide-for-installing-exchange-server-2019-preview/
Download iso exchange 2019:
https://www.microsoft.com/en-us/download/details.aspx?id=102900
Di chuyển từ Microsoft Exchange sang Google Workspace
Tổng quan
Trong
bài tập này, bạn sẽ di chuyển dữ liệu từ Microsoft® Exchange sang Google
Workspace. Có một số công cụ có sẵn có thể được sử dụng để di chuyển dữ liệu
sang Google Workspace. Ở đây bạn sẽ sử dụng Google Workspace Migration cho
Microsoft Exchange (GSMME), một công cụ cho phép bạn quản lý tập trung việc di
chuyển dữ liệu cho người dùng của mình.
Kịch bản
Hibeq đã
quyết định di chuyển một phần dữ liệu như một phần của quá trình chuyển đổi
sang Google Workspace. Là kỹ sư triển khai, nhóm dự án Hibeq đã yêu cầu bạn cấu
hình GSMME và chạy thử nghiệm di chuyển. Tại thời điểm này, Hibeq chỉ muốn xem
GSMME hoạt động như thế nào và hiểu liệu họ có cần thực hiện bất kỳ thay đổi cấu
hình mạng cục bộ nào để hỗ trợ di chuyển dữ liệu hay không.
Quan trọng: Tất cả các nhiệm vụ trong bài tập này phải được hoàn thành từ máy sinh viên ReadyTech của bạn.
Mục tiêu
Trong bài tập này, bạn sẽ hoàn thành các nhiệm vụ sau:
1. Tạo dữ liệu trong Exchange
Vì đây là một môi trường đào tạo, bạn sẽ tạo nội dung mà bạn sẽ di chuyển. Tuy nhiên, đó là thực hành tốt để chạy với một bộ dữ liệu nhỏ bằng cách sử dụng tài khoản thử nghiệm như bạn sẽ làm ở đây trước khi cố gắng di chuyển dữ liệu trực tiếp. Điều này cho phép bạn nhanh chóng xác nhận rằng GSMME được cấu hình chính xác và không có vấn đề mạng nào có thể ngăn chặn di chuyển tiến hành.
2. Tạo danh sách người dùng cần di chuyển
3. Ủy quyền GSMME kết nối với Google Workspace
4. Cấu hình và chạy GSMME
5. Xác minh kết quả trong Google Workspace
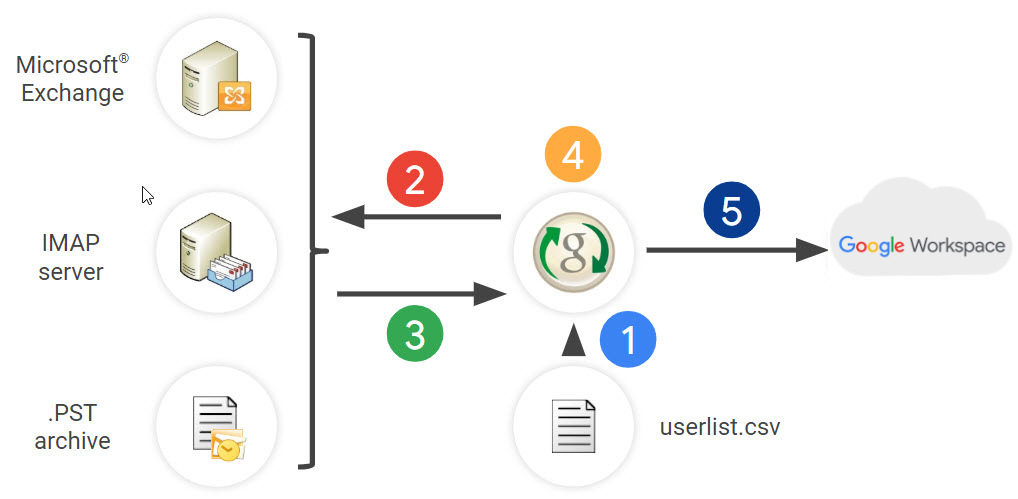
Sơ đồ dưới đây cho thấy cách GSMME di chuyển nội dung sang tài khoản Google Workspace.
Chuỗi sự kiện như sau:
1. Khách hàng tạo một tệp .csv chứa địa chỉ email của người dùng được di chuyển.
2. GSMME kết nối với máy chủ Exchange (hoặc nguồn dữ liệu khác) để truy xuất dữ liệu người dùng.
3. Dữ liệu được gửi đến GSMME để xử lý.
4. GSMME chuyển đổi dữ liệu sang định dạng được chỉ định bởi API của Google.
5. Dữ liệu được chèn qua Https vào tài khoản Google Workspace của người dùng.
Sơ đồ dưới đây cho thấy GSSME được cấu hình như thế nào trong môi trường đào tạo.
Ghi chú
1. Mạng đào tạo bao gồm một máy chủ Exchange.
2. Bạn sẽ cấu hình và chạy GSMME trên máy sinh viên của mình cũng là một phần của cùng một mạng lưới đào tạo.
3. GSMME kết nối với máy chủ Exchange và di chuyển dữ liệu cho người dùng bạn chỉ định.
Task 1. Create data in Exchange
Before you can run a migration you will need to create some data to migrate. In this task you use Microsoft Outlook® to add some data to your student’s Exchange account.
Note: You will be using an Outlook profile assigned to Student Zero to complete this task. As everyone is using the same account, it is expected that you will see each other sent messages and events as you work through this task.
Steps
Sign in to ReadyTech using the access code provided to you at the start of this course.
Click the Lab tab and sign in to your ReadyTech virtual machine.
Click the Outlook icon on your taskbar and click OK to choose the suggested Student Zero profile.
Compose and send two emails to
[_<your_student>_]@hibeq.com- A message with the subject Important message
- A message with the subject Winzip. Attach the winzip.exe file from your remote desktop.
Create a recurring calendar event and invite
[_<your_student>_]@hibeq.comto the event.Make the following changes to the recurring event:
- Cancel an occurrence
- Move an instance to another time
- Change the description or title of an instance
Close Outlook
Task 2. Create a list of users to migrate
GSMME uses a CSV file to determine which accounts to migrate. In its simplest form, this file contains a list of Exchange email addresses only. Where the Google Workspace address is different from the legacy email address, both addresses must be supplied. In this task, you create a file to migrate your student’s account to their newly provisioned Google Workspace account.
- Click the Notepad icon on our taskbar.
- Type the following:
[_your_student_]@hibeq.com,[_your_student_]@[_your_googleworkspace_domain_]
The file should look similar to the screenshot below.
Save your file as gsmme.csv and make a note of its location. You will need it later. Note: If you need to edit this file later, do not double click the file to open it as this will launch Excel. Instead, right click over the filename and open it with Notepad.
Close Notepad
Task 3. Authorize GSMME to connect to Google Workspace
Before you install GSMME you must first create a Google Cloud Console project and enable the migration APIs. You must also create a service account that will be granted domain wide access to each user account. GSMME will use this service account’s credentials as it migrates data into individual Google Workspace accounts. In this task, you configure a project to allow GSMME to access the Hibeq user’s accounts in Google Workspace.
Steps
Sign in to your Google Admin console as
student@[_your_googleworkspace_domain_]Complete the steps listed for GSMME in Create a service account to
- Create a project. Name the project gsmme
- Enable the APIs for the new project
- Create the service account. Name the service account gsmme
Complete Step 2 in Authorize GSMME for your account. You should follow the steps in the I'm not migrating from a Google Workspace account section.
Task 4. Configure and run GSMME
In the previous task, you configured Google Workspace to allow migrations from GSMME. In this task, you configure and run the GSMME software.
Steps
- Double click the Google Workspace Migration for Microsoft Exchange icon on your desktop.
- On the Step 1 of 3: Server Details page, specify the following and leave the remaining settings as their defaults:
| Property | Value(type or select) |
|---|---|
| Hostname/IP Address | 192.168.0.5 |
| Admin username | student@hibeq.com For the purpose of this training we have granted student@hibeq.com access to everyone’s mailbox on the Exchange server.Under normal circumstances you should create a special account which has delegated access to the mailboxes that are to be migrated. |
- Click Next
- On the Step 2 of 3: User and Domain Information page, and specify the following:
| Property | Value(type or select) |
|---|---|
| Google Workspace domain name: | [your_googleworkspace_domain] |
| Service Account credentials file | Browse to the service account file you created earlier |
| Google Workspace Admin user | student@[your_googleworkspace_domain] |
- Click Next.
- On the Step 3 of 3: Migration Settings page, specify the following and leave the remaining settings as their defaults:
| Property | Value(type or select) |
|---|---|
| File of accounts to migrate: | Browse to the file you created in Task 2 |
- Click Next. GSMME presents a confirmation dialog.
- Click Yes
- Review your settings.
- Select Migrate all data (including previously migrated data)
- Select Save settings
- Click Next
- You may be prompted for your Outlook credentials. If prompted, enter them as follows:
- For Username, types student@hibeq.com
- For Password, type Pa$$word1
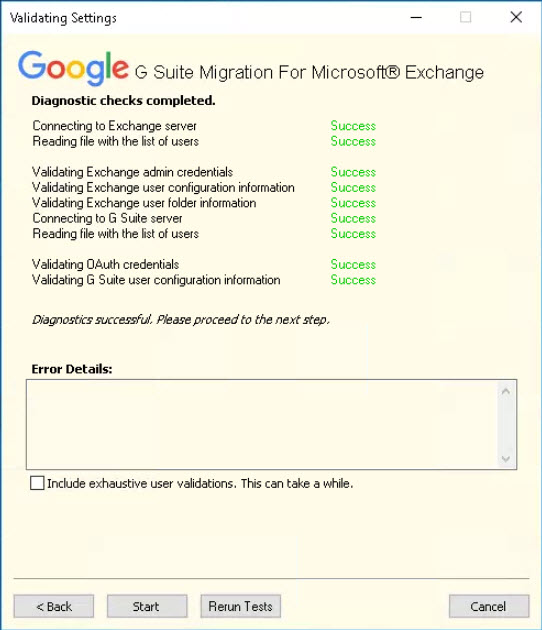
GSMME will now run some diagnostic checks. If any checks fail go back and confirm you have configured Google Workspace and GSMME correctly. Also, confirm that your date/time are set correctly on your student machine.
Once all checks succeed click Start
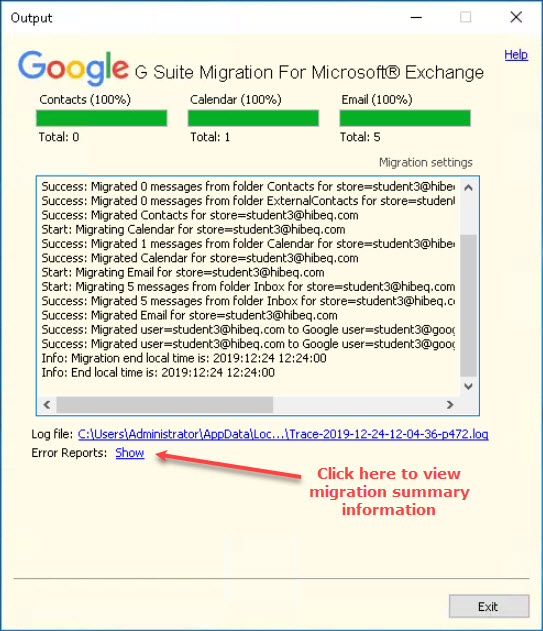
The screenshots below show example output from successful diagnostic and migration cycles.
Diagnostic results
Migration results
Click the Show link. This opens a report in the browser showing migration statistics including any failures that occurred.
Question: Notice that Failed messages count is 1. Why do you think that is the case? What message might have failed?
Answer: The message with the executable file cannot be migrated as these file types are not allowed by Gmail.
Verification steps:
Click the 1 link next to Total users
Click [your_student]@[your_googleworkspace_domain]
Click [your_student]@[your_googleworkspace_domain]/Inbox
Click Winzip (in the subject column). The reporting tool displays the reason for the failure.
Close the browser.
Click Exit, then click Yes to confirm you want to close GSMME.
Task 5. Verify the results in Google Workspace
In this task, you sign into Google Workspace and verify that the migration was successful.
Steps
- Sign to Gmail as [your_student]@[your_googleworkspace_domain]
- Locate and open Important message
- Delete Important message
- Open Google Calendar.
- Locate the event you created earlier and verify that the changes you made in Outlook are accurately reflected on your calendar. Note: You may be asked to change the calendar time zone to match your student machine.
Congratulations, you have installed and configured GSMME for Hibeq and ran a test migration to confirm that no network issues exist.
Resources
Wait for your instructor before continuing to the next part of the lab:


